Table of Contents
- Getting an Account on the Computers
- Using the Computers
- References for Further Learning
Getting an Account on the Computers
To get an account on the Tigress system have your faculty advisor
send a request to cses@princeton.edu for a new account on tiger.
An account on the tigercpu cluster gives you access to:
tigercpu: the cluster,tigressdata: a visualization node,jupyter.rc: a JupyterHub host.
Using the Computers
Which Computer Should I Use for My Research Project?
When you get an account on the clusters to collaborate with
researchers in the climate group, you are in effect given access to
three machines tigercpu, tigressdata and jupyterhub:
tigercpuis used to run simulations that require a lot of computational power.tigressdatais used for visualization and post-processing jobs. This machine runs a remote desktop which can make it easier to interact with the data,jupyterhubis a Jupyter notebook server. It runs the JupyterHub software.
So where should you start?
- If all you need is run some Jupyter notebooks on some climate
data, then
jupyterhubis the best place, - If you need to run other programs such as
Matlab,IDL,ncview, on climate data, then usetigressdata. One easy way to use tigressdata is through the remote desktop TurboVNC. - When you get started, unless you are going to run simulations, you should only access tigressdata.
- If you need to run computationally intensive jobs, then you will
need to use
tigercpu. It’s best to talk with your research advisor to determine whether your work will require tiger.
Logging in to the Computers
tigercpu or tigressdata: use an ssh client
You log in to either tigercpu or tigressdata through the ssh protocol. The remote
machines run the ssh server and you use an ssh client to it.
Which ssh client to use depends on the operating system on your
laptop or desktop:
macOScomes with ansshclient, so you don’t need to install anything. To access it you will need to start theTerminalapplication.Windows:Windowsdoes not come with an ssh client installed, so you need to install one yourself. There are multiplesshclient available forWindows. OIT recommends using MobaXterm. Other popular options are PuTTY and, on Windows 10 and higher installing you can install Install Windows Subsystem for Linux (WSL). If you need help installing or connecting to the remote computers, you can go to the OIT Tech Clinic in the Frist Campus Center.
When you connecting on a remote host you may need to use the FQDN (Fully Qualified Domain Name) in your ssh client application, they are:
tigercpu.princeton.edu,tigressdata.princeton.edu.
Jupyterhub
Jupyterhub web based and you access it by simply going to
https://jupyter.rc.princeton.edu/hub/home
in a web browser.
This section:
jupyter.rc
explains how to run Jupyter notebooks on jupyterhub.
Connecting from off-campus: use the VPN
You can only access tigercpu, tigressdata or jupyterhub in either of two scenarios:
- you are on campus, or,
-
you are using the VPN. The instructions for installing the VPN on your machine are here:
GlobalProtect VPN: Installation Instructions
The OIT Tech Clinic in the Frist Campus Center can help you install the VPN on your machine.
What is your username? Princeton NetID
Your username on the Research Computing machines is your Princeton NetID.
Unless you have an alias, your netid is the first part of your
Princeton email address. For instance is your Princeton email
address is jdoe@princeton.edu then your netid is most likely
jdoe.
To be sure what you netid is, go to the University’s web site:
https://www.princeton.edu
and search for your name, click on the People result, look for the NetID field.
Using the Computers
The Operating System: Linux
The Operating System (OS) on the Research Computing (RC) computers is called Linux. The best way to interact with those computers is through the command line, which is a departure from the Graphical User Interfaces (GUI) that come with the macOS or Windows.
You should spend some time learning the fundamentals of using the command line, not only will it make you more efficient, but avoiding learning it will cost you a lot of time. There are a lot of resources online to learn Linux, here are some recommendations:
- Linux Tutorial - Learn the Bash Command Line: this is a well written tutorial that covers the basic operations. It is a good place to get started.
- LinuxCommand.org: Learning the shell:
- This is written from the point view of someone running Linux on
their local machine. So the first part is about getting a shell on
your local machine. In your case you do not need a Terminal
running on your local machine, instead you connect on either
tigressdataortigecputo access a shell. But those sections are relevant and important:- Learning the shell - Lesson 2: Navigation
- Learning the shell - Lesson 3: Looking around
- You can ignore: Learning the shell - Lesson 4: A Guided Tour
- Learning the shell - Lesson 5: Manipulating Files
- Learning the shell - Lesson 6: Working with Commands
- Initialy, you can ignore: Learning the shell - Lesson 7: I/O Redirection
- Learning the shell - Lesson 8: Expansion
- Learning the shell - Lesson 9: Permissions
- Learning the shell - Lesson 10: Job Control
- You can ignore the rest at the beginning: LinuxCommand.org: Writing shell scripts.
- This is written from the point view of someone running Linux on
their local machine. So the first part is about getting a shell on
your local machine. In your case you do not need a Terminal
running on your local machine, instead you connect on either
- Software Capentry: The Unix Shell
- and a summary can be found here: Intro to Unix.
- If you prefer learning by watching videos, you can look at these:
- LinkedIn: Unix for macOS Users: Princeton University has a subcription to LinkedIn learning. Even though it is written for macOS, section 1 through 8 are relevant to Linux.
- O’Reilly: Linnux command line: Princeton University has a subscription to O’Reilly.
Using a Remote Desktop on tigressdata: TurboVNC
You can get a full Linux desktop environment on tigressdata through
a remote desktop software called TurboVNC. The primary use of TurboVNC
is to use visualization software remotely in an efficient maner. There
are two added benefits:
- Your TurboVNC session is stays open until
tigressdatais rebooted. This means that you can start working in one location, close your laptop, go somewhere else and resume your work: the processes you started are still running. This is to be contrasted to connected through thesshclient where your process are killed as soon as thesshsession is dropped. - Having a full graphical desktop environment makes it easier to
interact with the operating system. You can use the graphical
interface to manipulate and edit files for example. But remember
that
TurboVNCis only available ontigressdata.
To use TurboVNC you need to install and configure it. One good
reference on how to use it on the RC systems is:
How do I use VNC on Tigressdata?
The OIT Tech Clinic can also help you install it and use it on tigressdata
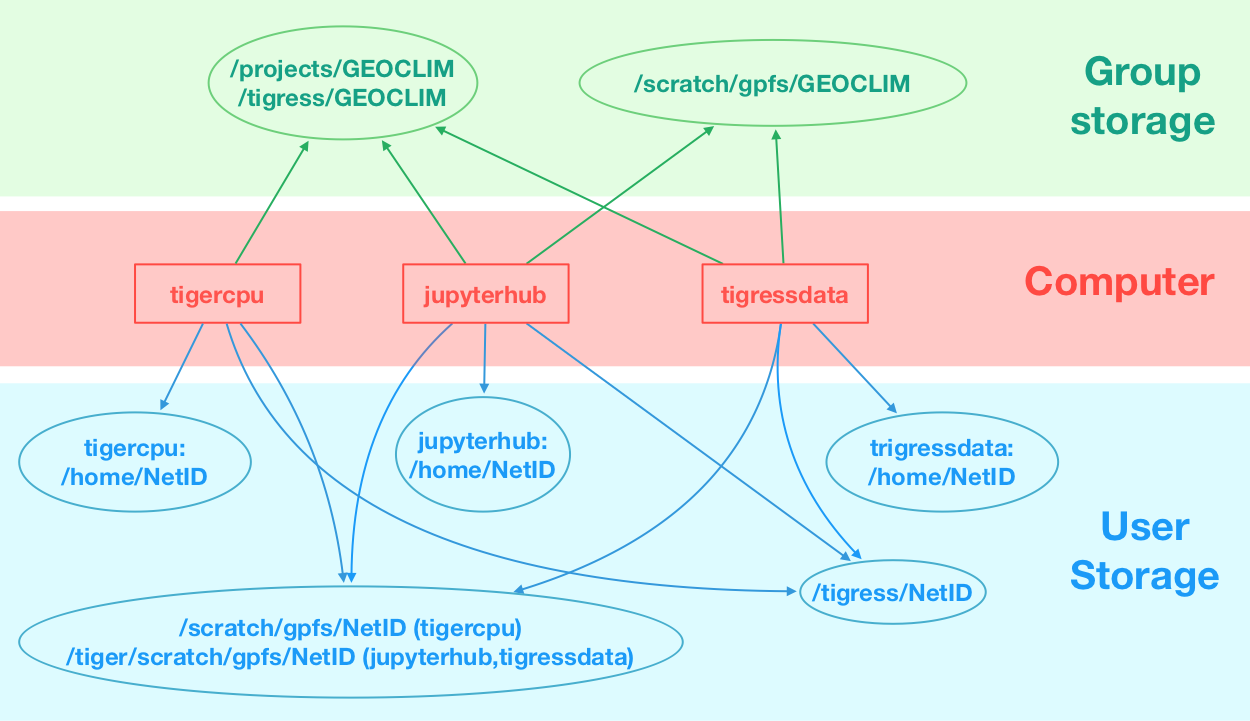
Data Storage
There are multiple places where you can store the data for your project. There are two major types of storage:
- storage that is reserved for a specific user,
- storage that is shared with the climate modelling group.
The storage locations reserved for user NetID are:
/home/NetID: each of the three machines have their own/homepartitions that only a specifc machine can access./tigress/NetIDand/scratch/gpfs/NetID: all three machines share these partitions. Note that/scratch/gpfs/NetIDis accessed fromtigressdataandjupytherfrom/tiger/scratch/gpfs/NetID
The storage locations shared by the group are:
/projects/GEOCLIMand/tigress/GEOCLIM:/tigress/GEOCLIMis an alias (a symbolic link) to/projects/GEOCLIM./scratch/gpfs/GEOCLIM: Note that/scratch/gpfs/GEOCLIMis accessed fromtigressdataandjupytherfrom/tiger/scratch/gpfs/GEOCLIM.
The figure below shows the different storage locations as well the machines that can access them. A machine can access a storage location if it has an arrow pointing to it.
There are three factors that differentiate the filesystems /home, (/tigress, /projects) and /scratch/gpfs:
- size:
/homeis limited, (/tigress,/projects) and/scratch/gpfsare large. - speed of access:
/home/and/scratch/gpfsare fast,/tigressand/projectsare slow. - backup:
/homeis backed up every day,/tigressand/projectsare backed weekly,/scratch/gpfsis not backed up.
Selecting a location for your data can be overwhelming at first, so to get started, assuming that your are working in the Resplandy group, follow those steps:
-
Create your own directory in
/projects/GEOCLIM/LRGROUPe.g.:$ mkdir /projects/GEOCLIM/LRGROUP/$USERwhere
$USERshould be automatically replaced by yourNetID. -
Store your data there.
Data import
Getting datasets onto the filesystem tigress (which can be accessed by all the machines above)
can be done in multiple ways:
- Download to local machine and transfer to remote (easy but only works for
medium sizeddatasets, which fit onto your local harddisk)
Download to local machine and transfer to remote
Download your dataset to a location on your harddrive (e.g. ~/Downloads).
From there you can copy the file to the remote filesystem by using
scp ~/Downloads/<yourfile> <username>@tigressdata.princeton.edu:/tigress/<username>/
The words in <...> need to be replaced with specific filesnames and your princeton username.
If you have set up SSH keys (e.g. if you log into tigressdata with ssh tigressdata),
you can simplify the command above to:
scp ~/Downloads/<yourfile> tigressdata:/tigress/<username>/
Now the file is in your folder on tigress and you can load it into your jupyter notebook,
by using the path /tigress/<username>/<yourfile>.
Always make a
README_<yourfile>.txtfile that describes where you got the data (links) and what is in the file. Copy that.txtfile like you did the datafile.
References for Further Learning
- This is an interesting online book that Julius Busecke contributed to: An Introduction to Earth and Environmental Data Science.